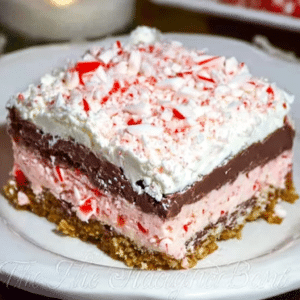

Holiday desserts have a unique way of creating comfort, joy, and connection. Among the many seasonal treats people look forward to, No-Bake Chocolate Peppermint Squares stand out for their delightful combination of textures, flavors, and simplicity. This recipe blends a buttery vanilla wafer crust, a cool and creamy peppermint filling, and a velvety chocolate pudding layer, all crowned with a light and fluffy whipped topping. The result is a dessert that is indulgent but refreshing, rich but not heavy, festive yet suitable for any occasion. It is a recipe that requires no oven, no complicated steps, and no advanced baking skills—making it accessible even to beginners while still impressing seasoned cooks.
In this article, we will explore every aspect of making No-Bake Chocolate Peppermint Squares, offering a comprehensive look at the ingredients, techniques, tips, variations, serving suggestions, storage instructions, and even the science behind some of the preparation steps. Whether you want to make this dessert for the holidays, a party, or simply as a sweet treat for your family, the following guide will help you master it with confidence. The ingredients you provided will be used exactly, and the structure will remain consistent and easy to follow. By the time you reach the end, you will not only know how to prepare the recipe but also understand how to adapt it, store it, troubleshoot it, and elevate it.
Let’s begin by breaking down the components of the dessert, starting with the crust—the foundation on which all the flavor layers will sit.
Ingredients
Crust
1 1/2 cups vanilla wafer crumbs
1/4 cup (1/2 stick) unsalted butter
2 tablespoons sugar
Peppermint Layer
8 oz cream cheese, softened
1/2 cup finely crushed peppermint candy cane or starlight mints
2 tablespoons milk
1/3 cup sugar
1 1/4 cup whipped topping
Chocolate Layer
1 package (4-serving size) instant chocolate pudding
1 3/4 cups milk
Topping
8 oz (1 tub) whipped topping
1/4 cup coarsely chopped peppermint candy cane
Preparation Method
1. Preparing the Vanilla Wafer Crust
The crust is an essential part of any layered dessert because it anchors the structure and provides a textural contrast to the creamy layers above it. To begin, place your vanilla wafer crumbs in a medium bowl. If you are crushing whole wafers, you can use a food processor for a fine consistency or a sealed plastic bag and rolling pin if you prefer a more rustic crumb texture. Add the 2 tablespoons of sugar to enhance sweetness and help the crust set more firmly.
Next, melt the 1/4 cup unsalted butter and pour it over the crumb mixture. Stir thoroughly until all crumbs are evenly moistened and resemble wet sand. The melted butter acts as a binder: once chilled, it will harden and allow the crust to hold its shape when sliced.
Transfer the mixture into an 8×8-inch or 9×9-inch pan, depending on the thickness you desire. Press it firmly into an even layer using your hands, the back of a spoon, or the bottom of a measuring cup. Applying firm pressure is important because a loosely packed crust will crumble when cut, while a well-pressed one will maintain neat layers. Refrigerate the crust for at least 20 minutes to set while you prepare the peppermint layer.
2. Making the Peppermint Cream Layer
The peppermint filling is what gives this dessert its iconic holiday flavor. Start by placing the softened cream cheese in a mixing bowl. Cream cheese needs to be fully softened and at room temperature to ensure a smooth, lump-free texture. Using a hand mixer or stand mixer, beat the cream cheese until light and creamy. This step incorporates air and creates a softer, more spreadable filling.
Add the 1/3 cup sugar and continue beating until the mixture becomes smooth and slightly fluffy. The sugar helps balance the tanginess of the cream cheese and contributes to a more dessert-friendly sweetness.
Next, add the 2 tablespoons of milk. This helps loosen the mixture and improves the final texture of the peppermint layer. Mix until well combined.
Now comes the festive touch: stir in the 1/2 cup of finely crushed peppermint candy canes or starlight mints. The crushing should be fine enough that the pieces blend into the cream cheese mixture but still provide tiny bursts of peppermint flavor. You can crush the candy using a plastic bag and rolling pin or pulse briefly in a food processor.
Finally, fold in the 1 1/4 cup whipped topping. Folding, rather than mixing vigorously, ensures the whipped topping retains some of its airiness, giving the peppermint layer a light, mousse-like quality. Once fully combined, spread this peppermint mixture evenly over the chilled crust. Smooth the surface with a spatula, making sure the layer is level and well distributed.
Refrigerate the dish again while you prepare the chocolate layer.
3. Preparing the Chocolate Pudding Layer
The chocolate layer adds richness and depth to the dessert, balancing the cool peppermint flavor with classic chocolate creaminess. In a bowl, whisk together the instant chocolate pudding mix and 1 3/4 cups milk. Use cold milk for best results, as it will help the pudding thicken properly.
Continue whisking for about two minutes until the mixture thickens. The beauty of instant pudding is its speed and reliability. Let the pudding sit for 3 to 5 minutes to achieve a slightly firmer consistency. This prevents it from seeping into the peppermint layer when spread.
Once ready, gently spoon or pour the pudding mixture over the peppermint layer. Work carefully to avoid disturbing the layer beneath. Spread the pudding evenly using a spatula, smoothing out any ripples to achieve a clean and uniform appearance.
Refrigerate again to allow the chocolate layer to firm before adding the final topping.
4. Adding the Whipped Topping and Peppermint Garnish
The final layer brings a beautiful, snowy finish to the dessert. Spread the 8 oz tub of whipped topping evenly over the chocolate layer. You can use the entire tub or adjust depending on how thick and fluffy you want this final topping to be. Smooth the surface with a spatula to create a neat appearance.
Sprinkle 1/4 cup of coarsely chopped peppermint candy cane over the topping. These larger pieces add crunch, color, and festive charm, making the dessert visually appealing and giving each bite a refreshing peppermint finish.
Refrigerate the dessert for at least 4 hours, or overnight if possible. This chilling time allows all the layers to firm up and come together harmoniously. When ready to serve, slice into squares using a sharp knife.
Tips for Recipe Success
Although this recipe is easy and requires no baking, there are several tips that can help you achieve the best possible texture, flavor, and presentation.
First, ensure that the cream cheese is fully softened before mixing. Cold cream cheese tends to form lumps that are difficult to smooth out, and those lumps disrupt the creamy consistency of the peppermint layer. Softening the cream cheese for at least 30 minutes at room temperature will make the mixing process easier.
Second, chilling between layers is essential. This dessert relies on stacking soft components, so each layer must be firm enough to hold the next. If you try to add the peppermint layer or chocolate layer before the previous one is set, the dessert may mix unintentionally or collapse into uneven layers.
Third, use cold milk when preparing the chocolate pudding. Instant pudding requires low temperatures to thicken properly, and using warm milk can prevent it from setting correctly.
Fourth, if you want clean, sharp edges when cutting the dessert into squares, use a sharp knife dipped in hot water and wiped clean between slices. This technique helps glide through the layers smoothly without dragging or smearing them.
Fifth, if you need to transport this dessert to a potluck or gathering, consider assembling it in a dish with a fitted lid. Alternatively, chill it thoroughly before covering it with plastic wrap to prevent the topping from sticking to the wrap.
Flavor Variations
One of the most enjoyable aspects of no-bake desserts is how adaptable they are. While the original version of No-Bake Chocolate Peppermint Squares is already delicious, you may want to tailor the recipe depending on your preferences or the occasion. Here are some creative variations you can try.
If you want a stronger peppermint flavor, add a few drops of peppermint extract to the cream cheese mixture. Be cautious, as peppermint extract is very potent—start with two or three drops and adjust to taste.
If you prefer a different crust flavor, substitute chocolate graham crackers or Oreo cookie crumbs for the vanilla wafer crumbs. This gives the dessert a deeper, richer base that complements the chocolate pudding layer.
For a fun twist, use white chocolate pudding instead of chocolate pudding. The result is a lighter, creamier dessert that emphasizes the peppermint flavor even more.
If you want added texture, sprinkle mini chocolate chips into the peppermint layer or over the chocolate pudding layer before adding the whipped topping. These small additions enhance the dessert without altering the overall balance.
For a more colorful presentation, mix crushed red-and-white peppermint pieces into the whipped topping before spreading. This adds a festive swirl effect and subtle mint flavor throughout the topping.
Serving Suggestions
No-Bake Chocolate Peppermint Squares are wonderful on their own, but serving them with complementary flavors or decorative touches can elevate the experience. If you want a richer presentation, drizzle chocolate syrup over each slice just before serving. The warmth of the syrup contrasts beautifully with the cool layers.
For a more festive holiday look, garnish each slice with a mini candy cane placed on top. Alternatively, dust lightly with cocoa powder or grate a small amount of dark chocolate over the whipped topping.
If you want to pair the dessert with a beverage, consider serving it with hot chocolate, peppermint tea, or even a mild coffee. These drinks complement the dessert’s flavors and enhance the overall experience.
Storage and Make-Ahead Instructions
One of the best features of this dessert is its excellent make-ahead capability. No-Bake Chocolate Peppermint Squares can be prepared completely the day before serving, making them ideal for busy holidays, gatherings, or meal planning.
To store, keep the dessert covered in the refrigerator. A plastic lid or tight-fitting cling wrap works best. The dessert will remain fresh for up to 3 to 4 days. If storing longer, note that peppermint candies on the topping may dissolve slightly, creating a marbled appearance. This does not affect flavor but may change the look.
Freezing is possible, though not recommended for preserving the fluffy texture of whipped topping. If you do choose to freeze, wrap tightly and thaw overnight in the refrigerator before serving.
Common Mistakes and Troubleshooting
Even simple recipes can present small challenges. Here are solutions to common issues.
If your crust crumbles when cutting, it may not have been pressed firmly enough. Next time, apply more pressure or add a tablespoon more melted butter to improve binding.
If the peppermint layer is runny, your cream cheese may have been too warm or over-mixed, causing it to lose structure. Chilling the layer longer before adding the chocolate pudding will help.
If the chocolate pudding layer seeps into the peppermint layer, the peppermint layer was likely too soft when the pudding was added. Always chill each layer until fully firm.
If the topping becomes watery, the whipped topping may have been exposed to moisture. Keep the dessert covered and avoid storing near foods with high humidity.
Conclusion
No-Bake Chocolate Peppermint Squares are a delightful dessert that combines ease, flavor, and visual appeal. With a buttery vanilla wafer crust, a cool peppermint cream layer, a decadent chocolate pudding middle, and a fluffy whipped topping sprinkled with peppermint pieces, this dessert offers a blend of textures and tastes that work wonderfully together. Whether you’re preparing it for the holidays, a special event, or simply to treat your family, this recipe provides a reliable, delicious result every time.
Below are some of the most frequently asked questions about this recipe to help you perfect it even further.
Print
No-Bake Chocolate Peppermint Squares: A Festive Dessert Classic
- Total Time: 20 minutes + chilling
- Yield: 9–12 squares
- Diet: Vegetarian
Description
No-Bake Chocolate Peppermint Squares are a festive, creamy, crunchy holiday dessert made with three irresistible layers—vanilla wafer crust, fluffy peppermint cream, and rich chocolate pudding topped with whipped cream and candy cane crunch.
Ingredients
Crust
- 1 1/2 cups vanilla wafer crumbs
- 1/4 cup (1/2 stick) unsalted butter, melted
- 2 tbsp sugar
Peppermint Layer
- 8 oz cream cheese, softened
- 1/2 cup finely crushed peppermint candy or starlight mints
- 2 tbsp milk
- 1/3 cup sugar
- 1 1/4 cups whipped topping
Chocolate Layer
- 1 (4-serving) package instant chocolate pudding
- 1 3/4 cups milk
Topping
- 8 oz whipped topping
- 1/4 cup coarsely chopped peppermint candy cane
Instructions
- Make the crust: Combine vanilla wafer crumbs, melted butter, and sugar. Press firmly into the bottom of an 8×8-inch dish. Chill while preparing the next layer.
- Peppermint layer: Beat softened cream cheese, sugar, milk, and crushed peppermint until smooth. Fold in whipped topping. Spread evenly over the crust.
- Chocolate layer: Whisk together instant pudding mix and milk until thickened. Spread over the peppermint layer.
- Topping: Spread whipped topping over the pudding layer, then sprinkle chopped peppermint candy on top.
- Refrigerate for at least 2 hours before slicing. Serve chilled.
Notes
- Use parchment paper for easy lifting and clean slicing.
- Crush candy canes finely for the peppermint layer, but keep topping pieces chunky.
- Can be made 24 hours ahead of time.
- Prep Time: 20 minutes
- Cook Time: 0 minutes
- Category: Dessert
- Method: No-Bake
- Cuisine: American
Frequently Asked Questions
1. Can I use homemade whipped cream instead of whipped topping?
Yes, you can use homemade whipped cream, but make sure it is whipped to stiff peaks so it holds structure. Also note that whipped topping tends to be more stable, especially for layered desserts.
2. Can I make this dessert ahead of time?
Absolutely. In fact, making it the day before serving allows the layers to set beautifully. Just keep it refrigerated and covered.
3. Can I use different cookies for the crust?
Yes. Graham crackers, chocolate graham crackers, or Oreo crumbs all work well. Each option adds a unique flavor twist.
4. Can I skip the peppermint candies?
You can omit them if you prefer a non-mint version. The dessert will still be delicious but will lose its signature peppermint character.
5. Why did my pudding layer turn too soft?
Using warm milk or not allowing the pudding to thicken before spreading can result in a softer layer. Always use cold milk and let the pudding stand for a few minutes before adding it to the dessert.
6. Can I freeze the dessert?
Freezing is possible but not ideal because whipped topping texture changes when frozen. If you must freeze it, thaw slowly in the refrigerator.
7. How long does the dessert last in the refrigerator?
No-Bake Chocolate Peppermint Squares stay fresh for 3 to 4 days when properly covered and refrigerated.